Icing Designs: Valentine's Day

We have always had a love for French Macarons, so when we created our Valentine's Day collection we made them the center of attention! But, since macarons are really a perfect treat for any time of the year, this collection can be used to celebrate any occasion!  We thought it would be fun to share some of our favorite party supplies that would compliment this pink and gold collection perfectly too!


Fill-in-the-blank Valentine's

Kellie and I both have kindergartners who just love to write, especially their names!  With Valentine's Day right around the corner, we know a lot of little one's have to give out Valentine cards to their classmates. So we designed a fill-in-the-blank Valentine's so that the kiddos can write their own names and the names of their friends. These can be ordered with any of our illustration{we just created samples with our owl love you forever and French macarons in a bell jar illustration}. They of course are hand-glittered and are available in our shop now! Happy heart day!


DIY conversation heart sign

Happy Monday!! So, we kind of went back and forth on whether to share this project with you or not. It is so simple its almost silly! But, we decided to after all, especially for those momma's with little ones looking for a little Valentine's Day project! I had to come up with an easy craft for the kinders to do for their school holiday party this past December and Kellie suggested making Santa beards with them! They were the biggest hit, we put them on stripped straws and they all got their photo taken in front of a fun photo both with their beards! {It was hilarious} Since, they had so much fun with  the beards, we thought for Valentine's Day we could make conversation heart signs! So, if you are a helper in your little's ones class and looking for an easy craft, these might just be your ticket! They are so simple and the kids have so much fun making them and love getting their picture taken with them! The photo makes a great keepsake for parents too!


Materials 
Card Stock {in color of your choice}
Glitter {optional}
Glue
Glittery letter stickers
{found at any craft store}
Stripped paper straws
Ribbon {Optional}
Glittery paper for punch hearts {optional}
Heart punch {optional}

1. You can either free hand a heart onto your cards stock or create a template that you can trace onto the card stock {this would be helpful if the kids are cutting them out themselves}.

2. Cut the heart out.

3. Once the heart is cut out, if you choose to you can glitter the edges. Simple take some glue and paint it along the outer edge of the heart, then sprinkle it with glitter.

4. You can spell whatever you choose on the heart with your glitter letter stickers. The kids can spell their names or sweet, hugs, I ♥ U, love, etc. {If they are creating an I ♥ U sign you can use a heart punch to create the ♥ from glittery paper.}

5. Finally glue the stripped straw on to the back of the sign and add a ribbon! You could even punch out glittery hearts and glue them to the ribbon.

These make the cutest signs for the kids to hold in front of a simple photo back drop, they would even look adorable on top of a cake!


DIY Valentine's Countdown Heart Air Balloon

We have our "heads in the clouds" over this DIY, created by our amazing and lovely friend and DIY correspondent, Katie! It is just the sweetest idea and we love everything about it! There is so much to love about Valentine's Day. What it is really all about to us is reminding the ones we love why we love them and this project may just be the sweetest way to do so! This adorable heart hot air balloon houses little love notes you can write to your child each day leading up to Valentine's Day. Just pick a theme like, "I love you because..." and each day your child can be reminded of how special they are! It is a Valentine's Day advent calendar or sorts!!  The heart air balloon would hang perfectly over your kitchen table, or in your little one's room, so each day they can pick a love note out of the basket!


Materials:

{The dimensions are based on the materials used, but you can make this any size you would like. Just make sure your "balloon" is proportionately bigger than your basket.}

2 pieces of fabric about 18"x16"
Small basket (the one pictured is from Hobby Lobby). You could also use a small box, etc. if you do not have a basket
Sewing machine
Needle and thread
Stuffing/Poly-fil
2 pieces of cording or ribbon about 48" in length
Trim, ribbon, other fabric to decorate your heart and basket
Paper hearts
Glue and glue gun 


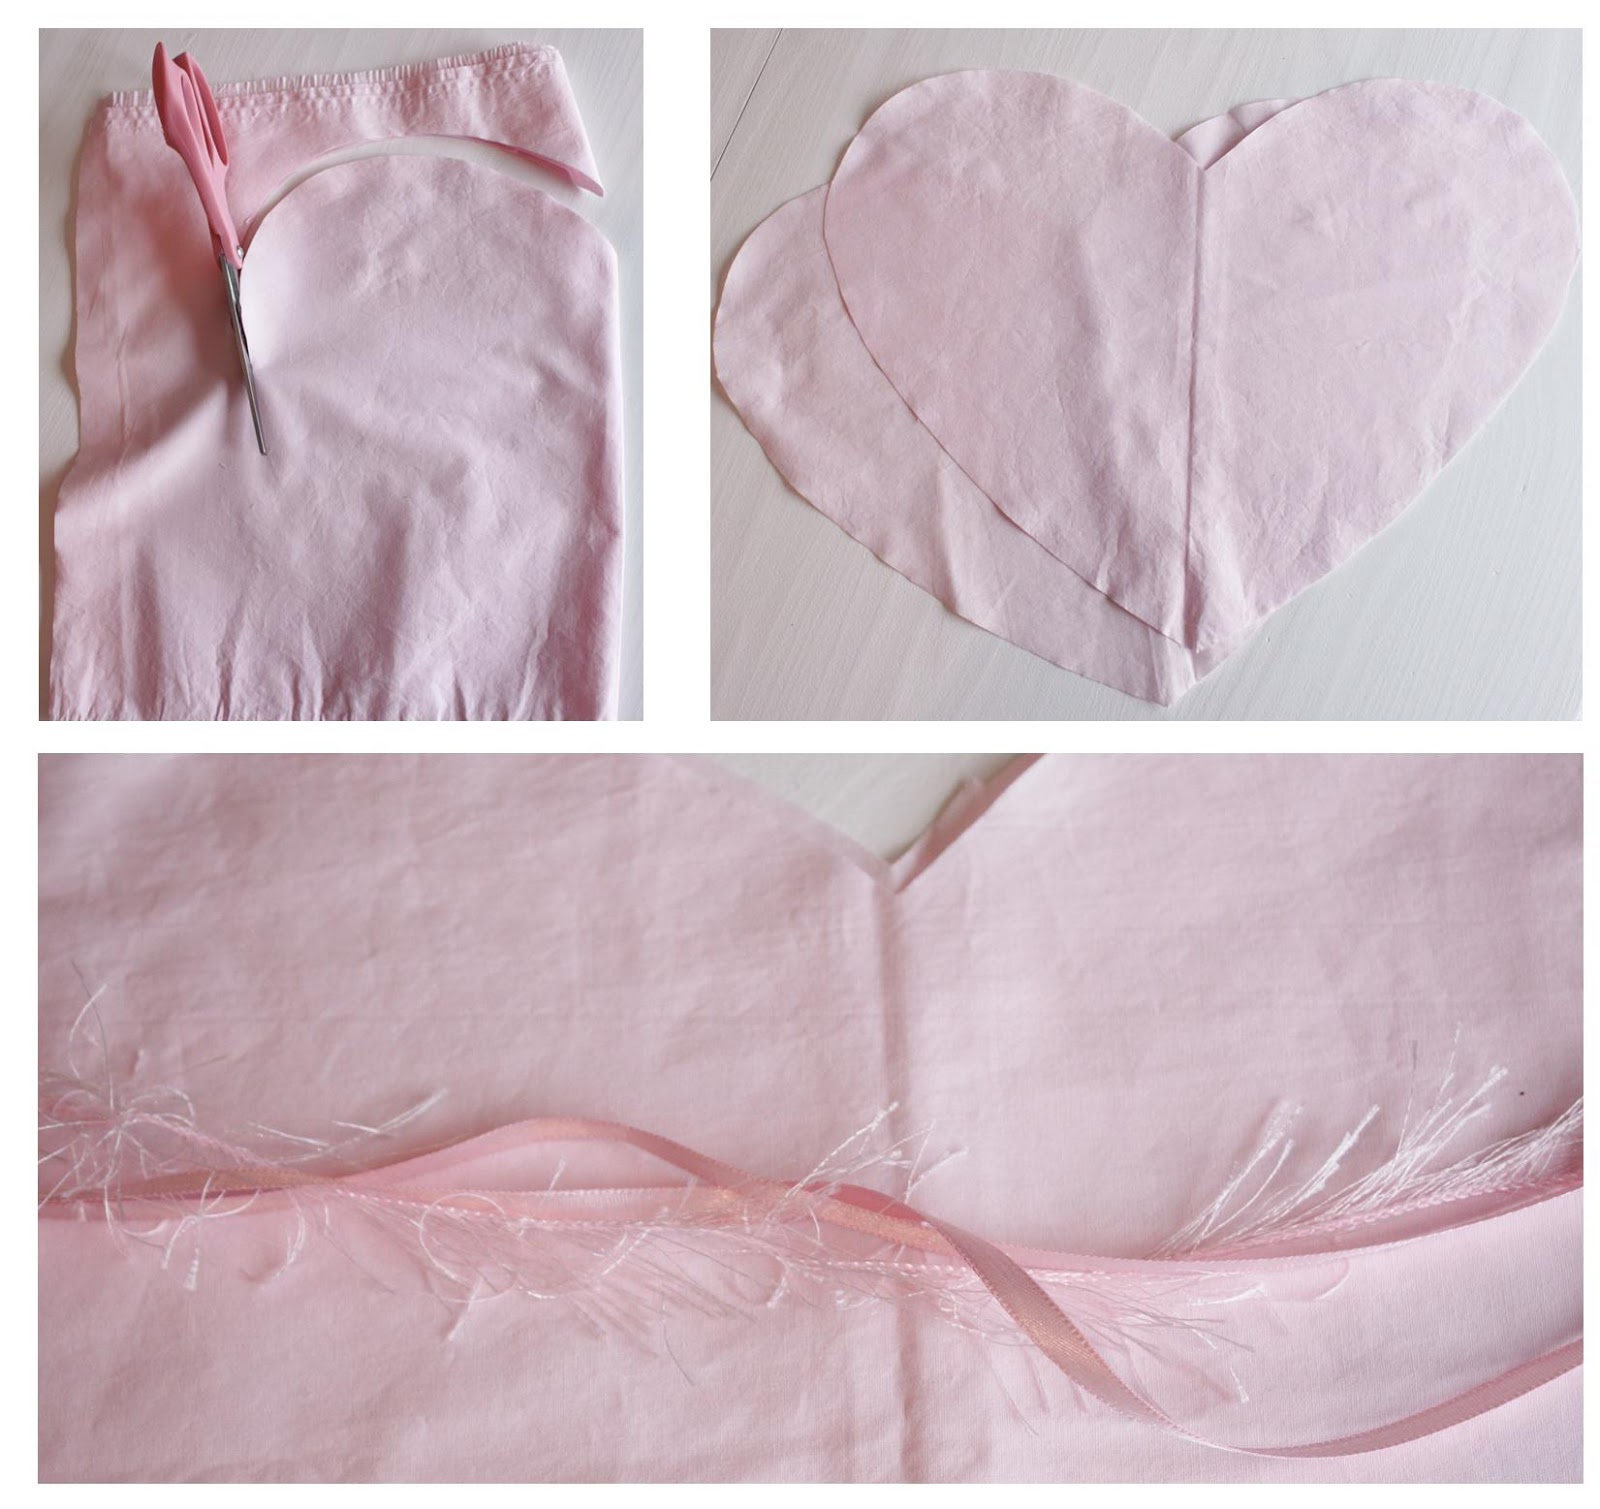
1. Place your two pieces of fabric on top of each other and fold in half. Cut out a heart shape, just as you would a paper heart.

2. Iron your fabric hearts. You can attach trim now if you'd like before sewing your pieces together, or after your have sewn and stuffed your heart shape, as I did.

3. Place right sides of fabric together and sew around your heart, leaving at least a 3-inch opening for turning and stuffing.

4. Turn your heart shape right side out and stuff with Poly-fil. Sew the opening closed by hand.


5. Fold your cording or ribbon in half to find the middle and place it over the top of one of the bumps of your heart. Make sure the cording length is equal on each side when hanging down.

6. Thread your needle and stitch your cording in place {stitch around the cording 4 or 5 times}. Do the same on the other side of your heart.


7. I found it was best to decorate the basket before attaching it to the heart shape. You can use whatever you like! I made a little ruffle and ribbon tassels with mini paper hearts attached. I just used hot glue to attach them to the basket.

8. Pin the front two lengths of cording first, making sure they are even. Pin the back two lengths of cording in place and hold your heart air balloon above your basket to make sure all of your lengths of cording are even and the basket hangs straight. Once you have them all even, hot glue or stitch them in place.

9. Using heavier thread or fishing line, cut your length of thread depending on where you are hanging your heart air balloon. Sew a few overlapping stitches in the center of your heart.  

10. Cut out paper hearts to write your love notes on and fill your basket!  


DIY Glittered Honeycomb Balls

Party props are one of our weaknesses! It seems like we are always stocking up on them, even when we don't need them! We remember honeycomb decorations being popular when we were little and now they are making a major comeback! They are available in so many colors and sizes, the possibilities of how to use them are endless! Well, being in the business of glitter, we did decided to do what only comes natural...glitter them! We love the way the turned out, when the light catches they they just off the perfect amount of sparkle! This DIY is so easy, these would look gorgeous at any celebration from a party to a wedding!

Materials 
honeycomb balls
glue
paint brush
glitter {martha stewart makes a great glitter for this project}


Simply take some tack glue and paint it all over the paper edge of your folded honeycomb ball. {Be generous with your glue}


Open you honeycomb ball up a little bit and try to make sure the glue hots every paper edge, you can be generous with the glue here as well.Close it back up and sprinkle glitter all over the glue, again open up the ball a bit and make sure glitter hits each spot that the glue is on. Pick it up and tap on the back to get rid of excess glitter. 

There will be a sticky tab on the back of the ball, take the paper and close the ball securely. Take the string and hang it on a lolli stick {or whatever you had available} to dry. One dry hang up and use as party of your party decor!!


Honeycomb balls from Sweet Lulu

These would be a perfect party decor compliment to our "sprinkles sprinkles everywhere
paper party collection! 


Happy birthday to you, my sweet friend...

Today is Kellie's Birthday, and I LOVE celebrating with her! She is such a beautiful spirit! She is humble and kind and is always selflessly doing so much for other people. I'm always so encouraged and inspired by her and am so  blessed to have someone like her in my life! I wanted to make her something really special to enjoy with her family after her birthday dinner! Kellie loves caramel and dark chocolate, so I combined those flavors to a make an extra special little treat! These cupcakes were a combination of a few recipes. I have to admit they are beyond delicious and are so worth the time. I can't wait to give them to her!

So happy birthday my sweet friend, may the year ahead be filled with more happiness than your heart can hold! May God fill bless your days with abundant joy. I'm so thankful for you and your friendship! Here's to a fabulous year, love you! ♥


Chocolate cupcakes with salted caramel buttercream frosting 

Chocolate Cake
{you can use any chocolate cake recipe you like here, the salted caramel buttercream is what really makes this recipe!}
We love to use Sweetapolita's chocolate cupcake recipe found here

Caramel
{via Ina Garten}

1 1/2 cups sugar
1/3 cup water 
1 1/4 cup heavy cream 
1/2 t pure vanilla extract

Mix water and sugar in a heavy-bottomed sauce pan. Cook over low for 5-10 minutes until the sugar dissolves. Do not stir. Increase the heat to medium  and boil uncovered until the sugar turns a chestnut brown color. {About 350 degrees on a candy thermometer} This will take about 5-7 minutes. This mixture will be veru hot and it can go from chestnut to burnt in a flash. Turn off the heat and add the cream and vanilla. The cream will be very bubbly and the sugar will seize. Turn the heat back on low and stir until all of the sugar had dissolved and a sauce has formed. Allow to cool, sauce will thicken as it cools. 

Salted Caramel Italian Buttercream 
{step by step recipe photos here}
sugar 16oz (1 pound)
water 4oz (about 1/2 cup)
egg whites 8oz (about 8 egg whites)
butter 16oz(1 pound)

Add the sugar and water to a heavy duty pot. Put your candy thermometer in the pot.
Add the egg whites to your kitchen mixer. Take the butter out of the refrigerator and let it sit on the counter while you are doing everything else. At this point you are going to boil your water and sugar until the candy thermometer reaches soft ball stage which is 240 degrees.

While the sugar and water are coming to a boil start your mixer so that the eggs are whipped enough to form a medium peek. (You can stop the mixer when they reach this point even if you sugar hasn't reached 240 degrees yet.
When you sugar has reached 240 degrees start your mixer again and slowly pour the hot sugar down the inside of the mixer. This process will cook your egg whites. Make sure that you do not pour the sugar onto the whisk of the mixer, but down the side of the bowl onto the egg whites.
Be very careful as the sugar is super hot!! If you feel the outside of the bowl you will see how hot it feels. Keep mixing until the bowl has cooled down considerably, until you can keep your hand on it with no problem. All of the mixing will add a lot of volume/air into your egg whites. 
If you add the butter when the bowl is to hot it will just melt, so let it mix for a good 10 minutes. At this point you can add the butter, little pieces at a time. After all the butter is in, let it mix a little bit longer and you will see that the frosting will come together. If it is still a little bit thin you can add another half stick of butter. 
Once the frosting is done take a little more than a 1/4 of a cup of the cooled caramel and a 1/2 teaspoon of salt and mix into frosting on the mixer. Once you have pipped the frosting on the cupcakes you can sprinkle some sea salty or fleur de sel on the top to add a little more saltiness! 


{all photos via Icing Designs}


DIY Paper Floral Crown

Having twins, it is near impossible to get a photo of both of the girls smiling or even looking at the camera. So, I have learned to be very candid in taking photos of them. This year, it was my goal to get a photo {with both girls in it} that we could use for our holiday cards. Of course, I knew I was going to do a frosted photo card. We love doing frosted photo items when there is a perfect little detail to glitter, like a bow, a ruffle or something in a little girl's hair. We love making and using paper flowers, and we had made a ton of them over the holidays to adorn our packages with. So, with my frosted photo card in mind, we decided to create a paper flower floral crown for my girls to wear in their holiday photos. We were actually thrilled with the way it turned out and decided to share the DIY with you, because not only does it make a lovely photo prop but these would be darling on flower girls for a wedding or a beautiful take home gift to give after a princess or tea party! The DIY is really fairly simple and use could use a variety to colors to coordinate with your child's clothing or theme.


Materials 
Card stock of your choice
Scissors
Hot glue
Mini ornaments
Eye lash yarn {Martha Stewart makes a great one}
Plain ribbon wrapped headband {Can be found at your local craft store, or you can use a plastic one and wrap ribbon color of your choice around it}

To create the flowers, follow our easy tutorial here
For this particular crown, we used a larger flower and two slightly smaller flowers. 
Simply glue the completed flowers on your headband. When you glue them try to angle them slightly toward 
the front. They look pretty if they are framing the child's face. 


{wish garland from here}


H&M Home LOVE

So, we love H&M but unfortunately, {here in the states} we can only shop there storefront right now! But, rumor has it that the retailer will be opening an online shop in the US this summer...hmmm, hope its true! We are kind of giddy over their kitchen collection right now! Oh my, it is so colorful and just plain fun! With milkshake tea towels, pink and turquoise scalloped cake stands, sweet little pink bow towel hooks...kind of makes us feel like kids in a candy store! So, as for now we can just swoon over the collection from across the pond, unless we want to pay international shipping...yikes! Happy Monday!!


Sprinkles Sprinkles Everywhere 6th Birthday Party

  We hope you liked our new "sprinkles, sprinkles everywhere" paper party goods! We put them to good used over our winter break at Kellie's youngest daughter {Leela's} 6th birthday party! We wanted the theme to be fun, colorful and different so we decided upon a Sprinkles party … specifically ‘sprinkles sprinkles everywhere’!
  We used colorful honeycomb balls from Sweet Lulu to create the looks of oversized sprinkles as a backdrop to our sweet table. Our sweet friend and DIY correspondent, Katie made the fun confetti garland that added another dimension of sprinkles! Finally, we hung a hand-glittered "sprinkle" letter garland to coordinate with all of our other paper goods. We made a sprinkle cake adorned with a number 6 oversized cake topper and had sprinkled marshmallows, sprinkled Italian sugar cookies, and sprinkled brownie pops for the girls to take home in a sweet pink bakery box. We created a small area on the sweet table where the girls got to dip  their own doughnuts in hot fudge and sprinkle them for dessert and then sipped on some yummy peppermint hot chocolate!
   Leela and her friends had so much fun with the activities  they decorating wooden star ornaments with sprinkles, played pass the doughnut {similar hot potato}, pin the cupcake on the pedestal, and our favorite,  freeze dance!  We also had a station set up for the girls to get Lalaloopsy tattoos … the girls loved it! 


The party was a big success with nothing but smiles from ear to ear.  Hope you love our new ‘sprinkles sprinkles everywhere’ paper goods as much as we do!!

Happy 6th Birthday Sweet Leela! 

Invitation and paper pary goods, styling and photography {oversized cake topper, tent cards, tags, bags, circle labels}: Icing Designs 
Honeycombs: Sweet LuLu {Colors: Cerise, Lilac, Light Blue and Pink}
Pin the cupcake on the pedestal idea came from: here
Pink Bakery Boxes: Martha Stewart
Confetti Garland: made by Katie Pietraszak


Blogging tips