Showing posts with label create and celebrate. Show all posts

Create and Celebrate: DIY Watercolor Paper Towel Ruffle Garland

Hi, this is Katie again and I am so excited to share this project with you! These gorgeous ruffle garlands are easier than they look and are made out of nothing more than paper towels dyed with food coloring. It is quite simple, but a bit time consuming. When editing the photos below for the step by step, I started laughing as I realized the photos reminded me of a paper towel commercial. Thankfully the end result is much prettier.  Enjoy!    

Materials:
Viva Paper Towels- one roll makes approximately 10ft. of garland. {I would recommend using this brand for the fabric-like quality. I would also recommend getting the full-sized sheets rather than the "choose-a-size" rolls}

Food coloring in any color. I used gel food coloring, but you can experiment with different dyes. Easter egg dye would make beautiful colors

Oven or dryer with rack attachment.  Drying in the sun on a warm day may also work

Sewing machine (optional, but much faster) or needle and thread


Mix food coloring with water and dip each end of the towel roll into the colored water
Saturate the rest of the roll with colored water.  You can also just submerge the whole roll. 
If you would like a bit more color variation on the ends, dip them again in darker colored water
Squeeze out as much of the excess water as you can

Now comes the time consuming part.  Set your oven to 200ยบ  Place the towel roll on a baking sheet and unroll one layer at a time, stacking the layers as they dry.  The second time I made these, I remembered I have a rack that goes in my dryer to dry items that cannot tumble.  It worked great for this project and I actually found it to be a bit faster.  I set the dryer on high and unrolled the towels every 5 minutes or so.  It will take several hours to dry the entire roll.   


Your stack of towels will look something like this after it is all dried

Lastly, choose a coordinating thread color and gather and sew down the middle of the towels. Don't worry if the sheets tear apart from the roll in certain places, you won't be able to tell once they are all sewn together. You can sew sections together to make the garlands any length you would like.


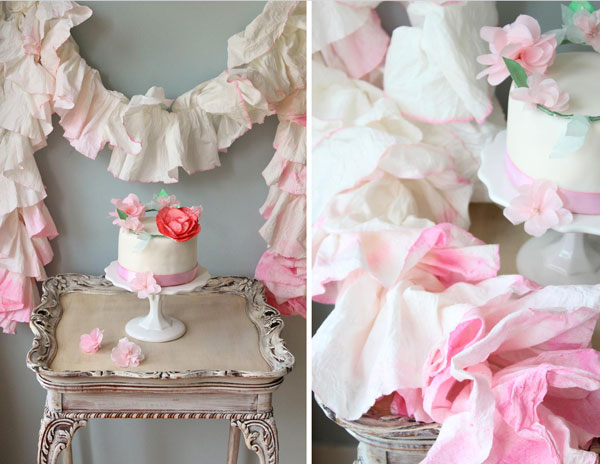
What a lovely backdrop for a sweet table!


Create & Celebrate: Easter Egg Cake Stand and A Pink Ruffle Garland Giveaway

Hi, my name is Katie and I'm absolutely thrilled to be sharing this first post with you! For the past few years, Melissa and Kellie have encouraged me to share several of my DIY projects on this beautiful blog. I am truly honored that they have asked me to contribute  a new monthly column entitled 'Create & Celebrate.' Nothing inspires me more than when I am asked to design something handmade for a special occasion, or to create party goods for a unique theme. I hope to provide a bit of inspiration to help you create memories and celebrate the sweet moments in life! So, let's get to it!

A week after Easter, I am still finding plastic eggs all over my house! Many of them seem to be missing one half or the other once they have been emptied of the treat inside. This project turns some of your extra egg inventory into a cake stand for your little ones!


{You will also need glue gun/glue and paint if you choose.}


1.  Glue the medium egg half onto the center of the bottom of your plate
2.  Glue the mini egg on top of the large egg half
3.  Glue the two pieces together. Be generous with the glue to fill in any gaps.
{Paint if you would like with spray paint and a non-toxic top coat.}

*We recommend using only play sweet treats with this cake stand, but it would be fun to use these as part of a centerpiece too!


Ruffle Garland Giveaway

I love incorporating handmade items into a celebration that can be used each year, played with, or even used as decor after the party. If you have seen some of my past projects it appears I might be a bit obsessed with ruffles, so I thought it would be fitting to give away a pink ruffle garland similar to those I made for Melissa's sweet girls' birthday party a few years ago. To enter, please leave a comment below telling us how you would use the garland. We will pick a winner at random on Friday. I can't wait to read your ideas!


**Please be sure to check back April 12th to see if you are the winner**
This is for one pin ruffle garland and the item will be shipped within 5 days of winning.
{Open to US and Oversea readers}


DIY Ruffled Ice Cream Cones

We are so excited to share this diy with you, if you are planning an ice cream party believe us these are just the sweetest things to let each child take home with them! Our amazing diy correspondent, Katie came up with this project for us and we just fell in love! We ended up hanging pink, peach and mint green ones from a white chandelier and the looked so cute and really added to the decor of the party! The little girls just adored them and were so excited when we let them have one! Most of them put them around their necks and pretended they were ice cream necklaces, it was so cute!

Materials:
2 1/2" styrofoam balls 
1 1/2 yards of lightweight cotton fabric
Sewing machine or needle and thread
Hot glue gun/glue
Glue
Scrapbook paper
Cone template
Polyester stuffing
Ribbon
Pins

Cut fabric into strips about 44" long x 1.5 " wide using pinking shears. Sew down the middle of the strip, ruffling fabric as you go with sewing machine. You can also ruffle the fabric by hand if you do not have a sewing machine. Your finished ruffle should be 8" long. You could also use pre-ruffled fabric or ruffle trim if you do not want to make your own!


Trace cone template onto your paper and cut out. Glue edges to make cone shape. I recommend not using hot glue for this step since you need a bit of extra time to get the edges together just right. Fill your cone with stuffing to help hold the shape.


Cut a circle roughly 8" in diameter out of your fabric. Wrap the fabric around the ball and hot glue to bottom, gathering as you go. Do not worry about how the bottom looks, it will be hidden inside your cone.


Place hot glue around inside edge of your cone and stick the covered styrofoam inside. Hot glue your ruffle around the top of the cone, twisting as you go around. Be sure to glue it to both the paper and the styrofoam ball. If you would like to hang the cones, cut ribbon to desired length and use a pin or hot glue to secure it to your ice cream!


Blogging tips